9 Homemade Mother's Day Crafts That Mum Will Treasure
[title size="2" content_align="center" style_type="double solid" sep_color="" margin_top="" margin_bottom="" class="" id=""]Mother's Day Handmade Gift Guide[/title][imageframe lightbox="no" lightbox_image="" style_type="none" hover_type="none" bordercolor="" bordersize="0px" borderradius="0" stylecolor="" align="none" link="" linktarget="_self" animation_type="0" animation_direction="down" animation_speed="0.1" animation_offset="" hide_on_mobile="no" class="" id=""]  [/imageframe][separator style_type="none" top_margin="10px" bottom_margin="10px" sep_color="" border_size="" icon="" icon_circle="" icon_circle_color="" width="" alignment="center" class="" id=""][fusion_text]With Mother's Day approaching, it's time to start searching for the perfect gift. Mums deserve the best every day of the year, but on Sunday 26th March, treat her to something extra special with one of these gifts, carefully selected to make the day as perfect as possible.
Whether you're shopping for mum, grandma, your mother-in-law, or even a friend, we have 9 unique handmade ideas that are perfect for the special women in your life.[/fusion_text][title size="2" content_align="left" style_type="double solid" sep_color="" margin_top="" margin_bottom="" class="" id=""]Mason Jar Frame Vase[/title][fusion_text]Start the day with a gorgeous bouquet of fresh flowers, before giving your mum something to smile about by turning a mason jar into a frame vase.
What you’ll need: Mason jar, paint brush, tape, spray paint, vinyl sticker and picture, coloured acrylic paint[/fusion_text][imageframe lightbox="no" lightbox_image="" style_type="none" hover_type="none" bordercolor="" bordersize="0px" borderradius="0" stylecolor="" align="none" link="" linktarget="_self" animation_type="0" animation_direction="down" animation_speed="0.1" animation_offset="" hide_on_mobile="no" class="" id=""]
[/imageframe][separator style_type="none" top_margin="10px" bottom_margin="10px" sep_color="" border_size="" icon="" icon_circle="" icon_circle_color="" width="" alignment="center" class="" id=""][fusion_text]With Mother's Day approaching, it's time to start searching for the perfect gift. Mums deserve the best every day of the year, but on Sunday 26th March, treat her to something extra special with one of these gifts, carefully selected to make the day as perfect as possible.
Whether you're shopping for mum, grandma, your mother-in-law, or even a friend, we have 9 unique handmade ideas that are perfect for the special women in your life.[/fusion_text][title size="2" content_align="left" style_type="double solid" sep_color="" margin_top="" margin_bottom="" class="" id=""]Mason Jar Frame Vase[/title][fusion_text]Start the day with a gorgeous bouquet of fresh flowers, before giving your mum something to smile about by turning a mason jar into a frame vase.
What you’ll need: Mason jar, paint brush, tape, spray paint, vinyl sticker and picture, coloured acrylic paint[/fusion_text][imageframe lightbox="no" lightbox_image="" style_type="none" hover_type="none" bordercolor="" bordersize="0px" borderradius="0" stylecolor="" align="none" link="" linktarget="_self" animation_type="0" animation_direction="down" animation_speed="0.1" animation_offset="" hide_on_mobile="no" class="" id=""]  [/imageframe][separator style_type="none" top_margin="10px" bottom_margin="10px" sep_color="" border_size="" icon="" icon_circle="" icon_circle_color="" width="" alignment="center" class="" id=""][fusion_text]How it’s done:
To create the picture frame window on your mason jar, place a shaped sticker of your choice onto the jar using painter’s tape around the area that you don’t want painted.
You'd do it like this:[/fusion_text][imageframe lightbox="no" lightbox_image="" style_type="none" hover_type="none" bordercolor="" bordersize="0px" borderradius="0" stylecolor="" align="none" link="" linktarget="_self" animation_type="0" animation_direction="down" animation_speed="0.1" animation_offset="" hide_on_mobile="no" class="" id=""]
[/imageframe][separator style_type="none" top_margin="10px" bottom_margin="10px" sep_color="" border_size="" icon="" icon_circle="" icon_circle_color="" width="" alignment="center" class="" id=""][fusion_text]How it’s done:
To create the picture frame window on your mason jar, place a shaped sticker of your choice onto the jar using painter’s tape around the area that you don’t want painted.
You'd do it like this:[/fusion_text][imageframe lightbox="no" lightbox_image="" style_type="none" hover_type="none" bordercolor="" bordersize="0px" borderradius="0" stylecolor="" align="none" link="" linktarget="_self" animation_type="0" animation_direction="down" animation_speed="0.1" animation_offset="" hide_on_mobile="no" class="" id=""]  [/imageframe][separator style_type="none" top_margin="10px" bottom_margin="10px" sep_color="" border_size="" icon="" icon_circle="" icon_circle_color="" width="" alignment="center" class="" id=""][fusion_text]After that, using acrylic paint, paint the outside of the jar and once done remove your sticker before the paint can dry.
You do not want to wait until the paint is dry or else it will be difficult to remove your sticker.
Then cut a picture of your choice to size and attach to the inside of your jar with painter’s tape.[/fusion_text][one_half last="no" spacing="yes" center_content="no" hide_on_mobile="no" background_color="" background_image="" background_repeat="no-repeat" background_position="left top" hover_type="none" link="" border_position="all" border_size="0px" border_color="" border_style="" padding="" margin_top="" margin_bottom="" animation_type="" animation_direction="" animation_speed="0.1" animation_offset="" class="" id=""][imageframe lightbox="no" lightbox_image="" style_type="none" hover_type="none" bordercolor="" bordersize="0px" borderradius="0" stylecolor="" align="none" link="" linktarget="_self" animation_type="0" animation_direction="down" animation_speed="0.1" animation_offset="" hide_on_mobile="no" class="" id=""]
[/imageframe][separator style_type="none" top_margin="10px" bottom_margin="10px" sep_color="" border_size="" icon="" icon_circle="" icon_circle_color="" width="" alignment="center" class="" id=""][fusion_text]After that, using acrylic paint, paint the outside of the jar and once done remove your sticker before the paint can dry.
You do not want to wait until the paint is dry or else it will be difficult to remove your sticker.
Then cut a picture of your choice to size and attach to the inside of your jar with painter’s tape.[/fusion_text][one_half last="no" spacing="yes" center_content="no" hide_on_mobile="no" background_color="" background_image="" background_repeat="no-repeat" background_position="left top" hover_type="none" link="" border_position="all" border_size="0px" border_color="" border_style="" padding="" margin_top="" margin_bottom="" animation_type="" animation_direction="" animation_speed="0.1" animation_offset="" class="" id=""][imageframe lightbox="no" lightbox_image="" style_type="none" hover_type="none" bordercolor="" bordersize="0px" borderradius="0" stylecolor="" align="none" link="" linktarget="_self" animation_type="0" animation_direction="down" animation_speed="0.1" animation_offset="" hide_on_mobile="no" class="" id=""]  [/imageframe][/one_half][one_half last="yes" spacing="yes" center_content="no" hide_on_mobile="no" background_color="" background_image="" background_repeat="no-repeat" background_position="left top" hover_type="none" link="" border_position="all" border_size="0px" border_color="" border_style="" padding="" margin_top="" margin_bottom="" animation_type="" animation_direction="" animation_speed="0.1" animation_offset="" class="" id=""][imageframe lightbox="no" lightbox_image="" style_type="none" hover_type="none" bordercolor="" bordersize="0px" borderradius="0" stylecolor="" align="none" link="" linktarget="_self" animation_type="0" animation_direction="down" animation_speed="0.1" animation_offset="" hide_on_mobile="no" class="" id=""]
  [/imageframe][/one_half][separator style_type="none" top_margin="10px" bottom_margin="10px" sep_color="" border_size="" icon="" icon_circle="" icon_circle_color="" width="" alignment="center" class="" id=""][fusion_text]Here's the secret: Make sure to seal the outside of the painted jar with clear spray paint as the paint will easily scrape off the jar if it is not sealed.
Now you're ready to place a paper cup inside your jar to help maintain the picture from any water substances and to hold your selection of flowers in place.
Done!
Find the full instructions here.[/fusion_text][title size="2" content_align="left" style_type="double solid" sep_color="" margin_top="" margin_bottom="" class="" id=""]DIY Marbled Mugs With Nail Polish[/title][fusion_text]Treat mum & explore your creative side this Mother's Day. These marble designed colourful mugs will make mum instantly feel like she's ready to sip on her favourite hot drink.[/fusion_text][imageframe lightbox="no" lightbox_image="" style_type="none" hover_type="none" bordercolor="" bordersize="0px" borderradius="0" stylecolor="" align="none" link="" linktarget="_self" animation_type="0" animation_direction="down" animation_speed="0.1" animation_offset="" hide_on_mobile="no" class="" id=""]
[/imageframe][/one_half][separator style_type="none" top_margin="10px" bottom_margin="10px" sep_color="" border_size="" icon="" icon_circle="" icon_circle_color="" width="" alignment="center" class="" id=""][fusion_text]Here's the secret: Make sure to seal the outside of the painted jar with clear spray paint as the paint will easily scrape off the jar if it is not sealed.
Now you're ready to place a paper cup inside your jar to help maintain the picture from any water substances and to hold your selection of flowers in place.
Done!
Find the full instructions here.[/fusion_text][title size="2" content_align="left" style_type="double solid" sep_color="" margin_top="" margin_bottom="" class="" id=""]DIY Marbled Mugs With Nail Polish[/title][fusion_text]Treat mum & explore your creative side this Mother's Day. These marble designed colourful mugs will make mum instantly feel like she's ready to sip on her favourite hot drink.[/fusion_text][imageframe lightbox="no" lightbox_image="" style_type="none" hover_type="none" bordercolor="" bordersize="0px" borderradius="0" stylecolor="" align="none" link="" linktarget="_self" animation_type="0" animation_direction="down" animation_speed="0.1" animation_offset="" hide_on_mobile="no" class="" id=""]  [/imageframe][separator style_type="none" top_margin="10px" bottom_margin="10px" sep_color="" border_size="" icon="" icon_circle="" icon_circle_color="" width="" alignment="center" class="" id=""][fusion_text]What you’ll need: Plain mugs, toothpicks, nail polish (preferably not quick dry), old plastic container[/fusion_text][imageframe lightbox="no" lightbox_image="" style_type="none" hover_type="none" bordercolor="" bordersize="0px" borderradius="0" stylecolor="" align="none" link="" linktarget="_self" animation_type="0" animation_direction="down" animation_speed="0.1" animation_offset="" hide_on_mobile="no" class="" id=""]
  [/imageframe][separator style_type="none" top_margin="10px" bottom_margin="10px" sep_color="" border_size="" icon="" icon_circle="" icon_circle_color="" width="" alignment="center" class="" id=""][fusion_text]How it’s done:
Place your plastic container on a flat surface and boil your kettle. Once boiled, fill your container halfway with boiling hot water.[/fusion_text][imageframe lightbox="no" lightbox_image="" style_type="none" hover_type="none" bordercolor="" bordersize="0px" borderradius="0" stylecolor="" align="none" link="" linktarget="_self" animation_type="0" animation_direction="down" animation_speed="0.1" animation_offset="" hide_on_mobile="no" class="" id=""]
[/imageframe][separator style_type="none" top_margin="10px" bottom_margin="10px" sep_color="" border_size="" icon="" icon_circle="" icon_circle_color="" width="" alignment="center" class="" id=""][fusion_text]How it’s done:
Place your plastic container on a flat surface and boil your kettle. Once boiled, fill your container halfway with boiling hot water.[/fusion_text][imageframe lightbox="no" lightbox_image="" style_type="none" hover_type="none" bordercolor="" bordersize="0px" borderradius="0" stylecolor="" align="none" link="" linktarget="_self" animation_type="0" animation_direction="down" animation_speed="0.1" animation_offset="" hide_on_mobile="no" class="" id=""]  [/imageframe][separator style_type="none" top_margin="10px" bottom_margin="10px" sep_color="" border_size="" icon="" icon_circle="" icon_circle_color="" width="" alignment="center" class="" id=""][fusion_text]With the nail polish bottle, very close to the surface of the water, pour a drop or two of polish into the water. Then swiftly use your toothpick to swirl the polish around in the water.
Next quickly dip your mug in the water! After that, place the mug on a paper towel to dry and you’re done!
Now make it happen!
Find the full instructions here.[/fusion_text][title size="2" content_align="left" style_type="double solid" sep_color="" margin_top="" margin_bottom="" class="" id=""]DIY Heartstring Wall Art[/title][fusion_text]Here’s a gift that will really tug on your mum’s heartstrings. This DIY string art piece may look complicated, but you’ll be surprised at how easy it is to do.[/fusion_text][imageframe lightbox="no" lightbox_image="" style_type="none" hover_type="none" bordercolor="" bordersize="0px" borderradius="0" stylecolor="" align="none" link="" linktarget="_self" animation_type="0" animation_direction="down" animation_speed="0.1" animation_offset="" hide_on_mobile="no" class="" id=""]
[/imageframe][separator style_type="none" top_margin="10px" bottom_margin="10px" sep_color="" border_size="" icon="" icon_circle="" icon_circle_color="" width="" alignment="center" class="" id=""][fusion_text]With the nail polish bottle, very close to the surface of the water, pour a drop or two of polish into the water. Then swiftly use your toothpick to swirl the polish around in the water.
Next quickly dip your mug in the water! After that, place the mug on a paper towel to dry and you’re done!
Now make it happen!
Find the full instructions here.[/fusion_text][title size="2" content_align="left" style_type="double solid" sep_color="" margin_top="" margin_bottom="" class="" id=""]DIY Heartstring Wall Art[/title][fusion_text]Here’s a gift that will really tug on your mum’s heartstrings. This DIY string art piece may look complicated, but you’ll be surprised at how easy it is to do.[/fusion_text][imageframe lightbox="no" lightbox_image="" style_type="none" hover_type="none" bordercolor="" bordersize="0px" borderradius="0" stylecolor="" align="none" link="" linktarget="_self" animation_type="0" animation_direction="down" animation_speed="0.1" animation_offset="" hide_on_mobile="no" class="" id=""]  [/imageframe][separator style_type="none" top_margin="10px" bottom_margin="10px" sep_color="" border_size="" icon="" icon_circle="" icon_circle_color="" width="" alignment="center" class="" id=""][fusion_text]What you’ll need: Embroidery thread, 1” nails, scissors, hammer, piece of pine, heart template[/fusion_text][imageframe lightbox="no" lightbox_image="" style_type="none" hover_type="none" bordercolor="" bordersize="0px" borderradius="0" stylecolor="" align="none" link="" linktarget="_self" animation_type="0" animation_direction="down" animation_speed="0.1" animation_offset="" hide_on_mobile="no" class="" id=""]
  [/imageframe][separator style_type="none" top_margin="10px" bottom_margin="10px" sep_color="" border_size="" icon="" icon_circle="" icon_circle_color="" width="" alignment="center" class="" id=""][fusion_text]How it’s done:
First place and tape your heart template to the centre of your wood plank. Now start hammering either the top or bottom of your heart and you’re your way around.
Try and keep the spacing as even as possible, once done remove your paper template and unwind some embroidery thread.[/fusion_text][imageframe lightbox="no" lightbox_image="" style_type="none" hover_type="none" bordercolor="" bordersize="0px" borderradius="0" stylecolor="" align="none" link="" linktarget="_self" animation_type="0" animation_direction="down" animation_speed="0.1" animation_offset="" hide_on_mobile="no" class="" id=""]
[/imageframe][separator style_type="none" top_margin="10px" bottom_margin="10px" sep_color="" border_size="" icon="" icon_circle="" icon_circle_color="" width="" alignment="center" class="" id=""][fusion_text]How it’s done:
First place and tape your heart template to the centre of your wood plank. Now start hammering either the top or bottom of your heart and you’re your way around.
Try and keep the spacing as even as possible, once done remove your paper template and unwind some embroidery thread.[/fusion_text][imageframe lightbox="no" lightbox_image="" style_type="none" hover_type="none" bordercolor="" bordersize="0px" borderradius="0" stylecolor="" align="none" link="" linktarget="_self" animation_type="0" animation_direction="down" animation_speed="0.1" animation_offset="" hide_on_mobile="no" class="" id=""]  [/imageframe][separator style_type="none" top_margin="10px" bottom_margin="10px" sep_color="" border_size="" icon="" icon_circle="" icon_circle_color="" width="" alignment="center" class="" id=""][fusion_text]Tie a double knot around your first nail and cut off any excess thread. Now, start connecting the nails with thread and keep going until you have connected all the nails.
When you finish, tie another double knot around a nail and cut off the excess thread again.
Remember to cut as close to the knot a possible so that you don’t see any bits of thread sticking out.
It's pretty straightforward once you think about it...
Find the full instructions here.[/fusion_text][title size="2" content_align="left" style_type="double solid" sep_color="" margin_top="" margin_bottom="" class="" id=""]DIY Cupcake Bouquet[/title][fusion_text]Sometimes the best gift you can give mum is your time. Give the gift of sugar-coated, sweet and fluffy cupcakes this Mother’s Day when you gift a bouquet of these rose moulded cupcakes decorated with creamy frosting.[/fusion_text][imageframe lightbox="no" lightbox_image="" style_type="none" hover_type="none" bordercolor="" bordersize="0px" borderradius="0" stylecolor="" align="none" link="" linktarget="_self" animation_type="0" animation_direction="down" animation_speed="0.1" animation_offset="" hide_on_mobile="no" class="" id=""]
[/imageframe][separator style_type="none" top_margin="10px" bottom_margin="10px" sep_color="" border_size="" icon="" icon_circle="" icon_circle_color="" width="" alignment="center" class="" id=""][fusion_text]Tie a double knot around your first nail and cut off any excess thread. Now, start connecting the nails with thread and keep going until you have connected all the nails.
When you finish, tie another double knot around a nail and cut off the excess thread again.
Remember to cut as close to the knot a possible so that you don’t see any bits of thread sticking out.
It's pretty straightforward once you think about it...
Find the full instructions here.[/fusion_text][title size="2" content_align="left" style_type="double solid" sep_color="" margin_top="" margin_bottom="" class="" id=""]DIY Cupcake Bouquet[/title][fusion_text]Sometimes the best gift you can give mum is your time. Give the gift of sugar-coated, sweet and fluffy cupcakes this Mother’s Day when you gift a bouquet of these rose moulded cupcakes decorated with creamy frosting.[/fusion_text][imageframe lightbox="no" lightbox_image="" style_type="none" hover_type="none" bordercolor="" bordersize="0px" borderradius="0" stylecolor="" align="none" link="" linktarget="_self" animation_type="0" animation_direction="down" animation_speed="0.1" animation_offset="" hide_on_mobile="no" class="" id=""]  [/imageframe][separator style_type="none" top_margin="10px" bottom_margin="10px" sep_color="" border_size="" icon="" icon_circle="" icon_circle_color="" width="" alignment="center" class="" id=""][fusion_text]What you’ll need: Cupcakes, frosting, flower pot and styrofoam ball, green tissue paper, tape, piping bag and toothpicks[/fusion_text][imageframe lightbox="no" lightbox_image="" style_type="none" hover_type="none" bordercolor="" bordersize="0px" borderradius="0" stylecolor="" align="none" link="" linktarget="_self" animation_type="0" animation_direction="down" animation_speed="0.1" animation_offset="" hide_on_mobile="no" class="" id=""]
  [/imageframe][separator style_type="none" top_margin="10px" bottom_margin="10px" sep_color="" border_size="" icon="" icon_circle="" icon_circle_color="" width="" alignment="center" class="" id=""][fusion_text]How it’s done:
Bake or buy cupcakes of your choice e.g. vanilla, chocolate etc. Make buttercream frosting using a suitable recipe and fill a piping bag with the frosting.
Carefully pipe a cupcake rose on each cupcake. Once done, place the cupcakes in the fridge to keep the frosting firm.
Place the styrofoam ball into your flower pot. Place two toothpicks in each area where you want a cupcake. Then remove the cupcakes from the fridge and slide a cupcake onto each pair of toothpicks.
Let's look at it in detail:[/fusion_text][imageframe lightbox="no" lightbox_image="" style_type="none" hover_type="none" bordercolor="" bordersize="0px" borderradius="0" stylecolor="" align="none" link="" linktarget="_self" animation_type="0" animation_direction="down" animation_speed="0.1" animation_offset="" hide_on_mobile="no" class="" id=""]
[/imageframe][separator style_type="none" top_margin="10px" bottom_margin="10px" sep_color="" border_size="" icon="" icon_circle="" icon_circle_color="" width="" alignment="center" class="" id=""][fusion_text]How it’s done:
Bake or buy cupcakes of your choice e.g. vanilla, chocolate etc. Make buttercream frosting using a suitable recipe and fill a piping bag with the frosting.
Carefully pipe a cupcake rose on each cupcake. Once done, place the cupcakes in the fridge to keep the frosting firm.
Place the styrofoam ball into your flower pot. Place two toothpicks in each area where you want a cupcake. Then remove the cupcakes from the fridge and slide a cupcake onto each pair of toothpicks.
Let's look at it in detail:[/fusion_text][imageframe lightbox="no" lightbox_image="" style_type="none" hover_type="none" bordercolor="" bordersize="0px" borderradius="0" stylecolor="" align="none" link="" linktarget="_self" animation_type="0" animation_direction="down" animation_speed="0.1" animation_offset="" hide_on_mobile="no" class="" id=""]  [/imageframe][separator style_type="none" top_margin="10px" bottom_margin="10px" sep_color="" border_size="" icon="" icon_circle="" icon_circle_color="" width="" alignment="center" class="" id=""][fusion_text]After that, cut and shape the green tissue paper into a small accordion and place a piece of clear tape at the pinched part of the tissue paper and stick it to the exposed styrofoam in between the cupcakes.
And you’re done!
Find the full instructions here.[/fusion_text][title size="2" content_align="left" style_type="double solid" sep_color="" margin_top="" margin_bottom="" class="" id=""]Marbled Clay Jewellery Dish[/title][fusion_text]With Mother’s Day, weeks away, this little marbled clay ring dish is the perfect gift to make for your mum.
What you’ll need: Coloured oven bake clay, plastic clay knife, small bowl, gold liquid gilding, small paintbrush, rolling pin, large jar[/fusion_text][imageframe lightbox="no" lightbox_image="" style_type="none" hover_type="none" bordercolor="" bordersize="0px" borderradius="0" stylecolor="" align="none" link="" linktarget="_self" animation_type="0" animation_direction="down" animation_speed="0.1" animation_offset="" hide_on_mobile="no" class="" id=""]
[/imageframe][separator style_type="none" top_margin="10px" bottom_margin="10px" sep_color="" border_size="" icon="" icon_circle="" icon_circle_color="" width="" alignment="center" class="" id=""][fusion_text]After that, cut and shape the green tissue paper into a small accordion and place a piece of clear tape at the pinched part of the tissue paper and stick it to the exposed styrofoam in between the cupcakes.
And you’re done!
Find the full instructions here.[/fusion_text][title size="2" content_align="left" style_type="double solid" sep_color="" margin_top="" margin_bottom="" class="" id=""]Marbled Clay Jewellery Dish[/title][fusion_text]With Mother’s Day, weeks away, this little marbled clay ring dish is the perfect gift to make for your mum.
What you’ll need: Coloured oven bake clay, plastic clay knife, small bowl, gold liquid gilding, small paintbrush, rolling pin, large jar[/fusion_text][imageframe lightbox="no" lightbox_image="" style_type="none" hover_type="none" bordercolor="" bordersize="0px" borderradius="0" stylecolor="" align="none" link="" linktarget="_self" animation_type="0" animation_direction="down" animation_speed="0.1" animation_offset="" hide_on_mobile="no" class="" id=""]  [/imageframe][separator style_type="none" top_margin="10px" bottom_margin="10px" sep_color="" border_size="" icon="" icon_circle="" icon_circle_color="" width="" alignment="center" class="" id=""][fusion_text]How it’s done:
Roll each colour of clay that you want to use into a snake about 5" long then combine them into one big roll and twist together.
Roll the large twist into a snake about twice the original length then smoosh all the clay into a ball.[/fusion_text][imageframe lightbox="no" lightbox_image="" style_type="none" hover_type="none" bordercolor="" bordersize="0px" borderradius="0" stylecolor="" align="none" link="" linktarget="_self" animation_type="0" animation_direction="down" animation_speed="0.1" animation_offset="" hide_on_mobile="no" class="" id=""]
[/imageframe][separator style_type="none" top_margin="10px" bottom_margin="10px" sep_color="" border_size="" icon="" icon_circle="" icon_circle_color="" width="" alignment="center" class="" id=""][fusion_text]How it’s done:
Roll each colour of clay that you want to use into a snake about 5" long then combine them into one big roll and twist together.
Roll the large twist into a snake about twice the original length then smoosh all the clay into a ball.[/fusion_text][imageframe lightbox="no" lightbox_image="" style_type="none" hover_type="none" bordercolor="" bordersize="0px" borderradius="0" stylecolor="" align="none" link="" linktarget="_self" animation_type="0" animation_direction="down" animation_speed="0.1" animation_offset="" hide_on_mobile="no" class="" id=""]  [/imageframe][separator style_type="none" top_margin="10px" bottom_margin="10px" sep_color="" border_size="" icon="" icon_circle="" icon_circle_color="" width="" alignment="center" class="" id=""][fusion_text]Use a rolling pin or glass jar to roll out your marbled ball to 1/4" thick and use a round item about 6" wide as a template and cut out your dish circle with a clay knife.
Place your circle gently into an oven-safe bowl that is a little smaller than your circle and bake the bowl per the temperature on the clay package.
Remove the bowl from the oven and allow the clay to cool before turning the larger bowl upside down and tapping lightly until the clay dish falls out.[/fusion_text][imageframe lightbox="no" lightbox_image="" style_type="none" hover_type="none" bordercolor="" bordersize="0px" borderradius="0" stylecolor="" align="none" link="" linktarget="_self" animation_type="0" animation_direction="down" animation_speed="0.1" animation_offset="" hide_on_mobile="no" class="" id=""]
[/imageframe][separator style_type="none" top_margin="10px" bottom_margin="10px" sep_color="" border_size="" icon="" icon_circle="" icon_circle_color="" width="" alignment="center" class="" id=""][fusion_text]Use a rolling pin or glass jar to roll out your marbled ball to 1/4" thick and use a round item about 6" wide as a template and cut out your dish circle with a clay knife.
Place your circle gently into an oven-safe bowl that is a little smaller than your circle and bake the bowl per the temperature on the clay package.
Remove the bowl from the oven and allow the clay to cool before turning the larger bowl upside down and tapping lightly until the clay dish falls out.[/fusion_text][imageframe lightbox="no" lightbox_image="" style_type="none" hover_type="none" bordercolor="" bordersize="0px" borderradius="0" stylecolor="" align="none" link="" linktarget="_self" animation_type="0" animation_direction="down" animation_speed="0.1" animation_offset="" hide_on_mobile="no" class="" id=""]  [/imageframe][separator style_type="none" top_margin="10px" bottom_margin="10px" sep_color="" border_size="" icon="" icon_circle="" icon_circle_color="" width="" alignment="center" class="" id=""][fusion_text]Once the clay is completely cool, use a small brush to paint the rim of the dish and allow the paint to dry. Seal the dish with a glaze if you desire.[/fusion_text][imageframe lightbox="no" lightbox_image="" style_type="none" hover_type="none" bordercolor="" bordersize="0px" borderradius="0" stylecolor="" align="none" link="" linktarget="_self" animation_type="0" animation_direction="down" animation_speed="0.1" animation_offset="" hide_on_mobile="no" class="" id=""]
  [/imageframe][separator style_type="none" top_margin="10px" bottom_margin="10px" sep_color="" border_size="" icon="" icon_circle="" icon_circle_color="" width="" alignment="center" class="" id=""][fusion_text]So what are you waiting for?
Find the full instructions here.[/fusion_text][title size="2" content_align="left" style_type="double solid" sep_color="" margin_top="" margin_bottom="" class="" id=""]DIY Bath Bombs[/title][fusion_text]Who doesn’t love an opportunity to relax, unwind and indulge? Give mum the gift of an at-home spa, so that she can take some time for herself, even if she only has an hour to spare.
The gift of luxury is always a winner! Pick a gorgeous new scent or a classic you just know she will adore, and make a jar of luxe bath bombs to encourage her to take a dang break for once.[/fusion_text][imageframe lightbox="no" lightbox_image="" style_type="none" hover_type="none" bordercolor="" bordersize="0px" borderradius="0" stylecolor="" align="none" link="" linktarget="_self" animation_type="0" animation_direction="down" animation_speed="0.1" animation_offset="" hide_on_mobile="no" class="" id=""]
[/imageframe][separator style_type="none" top_margin="10px" bottom_margin="10px" sep_color="" border_size="" icon="" icon_circle="" icon_circle_color="" width="" alignment="center" class="" id=""][fusion_text]So what are you waiting for?
Find the full instructions here.[/fusion_text][title size="2" content_align="left" style_type="double solid" sep_color="" margin_top="" margin_bottom="" class="" id=""]DIY Bath Bombs[/title][fusion_text]Who doesn’t love an opportunity to relax, unwind and indulge? Give mum the gift of an at-home spa, so that she can take some time for herself, even if she only has an hour to spare.
The gift of luxury is always a winner! Pick a gorgeous new scent or a classic you just know she will adore, and make a jar of luxe bath bombs to encourage her to take a dang break for once.[/fusion_text][imageframe lightbox="no" lightbox_image="" style_type="none" hover_type="none" bordercolor="" bordersize="0px" borderradius="0" stylecolor="" align="none" link="" linktarget="_self" animation_type="0" animation_direction="down" animation_speed="0.1" animation_offset="" hide_on_mobile="no" class="" id=""]  [/imageframe][separator style_type="none" top_margin="10px" bottom_margin="10px" sep_color="" border_size="" icon="" icon_circle="" icon_circle_color="" width="" alignment="center" class="" id=""][fusion_text]What you’ll need: Baking soda, citric acid, fragrance oil, pipettes, mini-muffin pan, wax paper, water-free colourant, measuring cup, bowl and whisk.
Trust me. It’ll all be worth it.[/fusion_text][imageframe lightbox="no" lightbox_image="" style_type="none" hover_type="none" bordercolor="" bordersize="0px" borderradius="0" stylecolor="" align="none" link="" linktarget="_self" animation_type="0" animation_direction="down" animation_speed="0.1" animation_offset="" hide_on_mobile="no" class="" id=""]
[/imageframe][separator style_type="none" top_margin="10px" bottom_margin="10px" sep_color="" border_size="" icon="" icon_circle="" icon_circle_color="" width="" alignment="center" class="" id=""][fusion_text]What you’ll need: Baking soda, citric acid, fragrance oil, pipettes, mini-muffin pan, wax paper, water-free colourant, measuring cup, bowl and whisk.
Trust me. It’ll all be worth it.[/fusion_text][imageframe lightbox="no" lightbox_image="" style_type="none" hover_type="none" bordercolor="" bordersize="0px" borderradius="0" stylecolor="" align="none" link="" linktarget="_self" animation_type="0" animation_direction="down" animation_speed="0.1" animation_offset="" hide_on_mobile="no" class="" id=""]  [/imageframe][separator style_type="none" top_margin="10px" bottom_margin="10px" sep_color="" border_size="" icon="" icon_circle="" icon_circle_color="" width="" alignment="center" class="" id=""][fusion_text]How it’s done: Start by adding one cup of baking soda to your mixing bowl and work out all the clumps. Next, add one half cup of citric acid to the baking soda – thoroughly mix and break up any clumps. Now add a few ounces of fragrance oil and thoroughly mix into the powders. Then add your colourant, using only non-water based liquid colour.
After that use a spray bottle to add some witch hazel. If your mixture makes a nice clump – it’s ready! Add the mixture a mini-muffin pan, set a timer for 10 minutes and let them sit. After the time is up, carefully turn them onto a sheet of wax paper to let them fully dry. Find the full instructions here.[/fusion_text][title size="2" content_align="left" style_type="double solid" sep_color="" margin_top="" margin_bottom="" class="" id=""]Mum's Emergency Stash[/title][fusion_text]It’s time to start munching on little treats! This is so easy to make - you can easily pick up a clear organiser box from a pound shop or supermarket and add a little handcrafted gift tag.
How can you resist?[/fusion_text][imageframe lightbox="no" lightbox_image="" style_type="none" hover_type="none" bordercolor="" bordersize="0px" borderradius="0" stylecolor="" align="none" link="" linktarget="_self" animation_type="0" animation_direction="down" animation_speed="0.1" animation_offset="" hide_on_mobile="no" class="" id=""]
[/imageframe][separator style_type="none" top_margin="10px" bottom_margin="10px" sep_color="" border_size="" icon="" icon_circle="" icon_circle_color="" width="" alignment="center" class="" id=""][fusion_text]How it’s done: Start by adding one cup of baking soda to your mixing bowl and work out all the clumps. Next, add one half cup of citric acid to the baking soda – thoroughly mix and break up any clumps. Now add a few ounces of fragrance oil and thoroughly mix into the powders. Then add your colourant, using only non-water based liquid colour.
After that use a spray bottle to add some witch hazel. If your mixture makes a nice clump – it’s ready! Add the mixture a mini-muffin pan, set a timer for 10 minutes and let them sit. After the time is up, carefully turn them onto a sheet of wax paper to let them fully dry. Find the full instructions here.[/fusion_text][title size="2" content_align="left" style_type="double solid" sep_color="" margin_top="" margin_bottom="" class="" id=""]Mum's Emergency Stash[/title][fusion_text]It’s time to start munching on little treats! This is so easy to make - you can easily pick up a clear organiser box from a pound shop or supermarket and add a little handcrafted gift tag.
How can you resist?[/fusion_text][imageframe lightbox="no" lightbox_image="" style_type="none" hover_type="none" bordercolor="" bordersize="0px" borderradius="0" stylecolor="" align="none" link="" linktarget="_self" animation_type="0" animation_direction="down" animation_speed="0.1" animation_offset="" hide_on_mobile="no" class="" id=""]  [/imageframe][separator style_type="none" top_margin="10px" bottom_margin="10px" sep_color="" border_size="" icon="" icon_circle="" icon_circle_color="" width="" alignment="center" class="" id=""][fusion_text]What you’ll need: Plastic organiser box, ribbon, chocolate, card stock, printable ‘mum’s emergency stash’ tag[/fusion_text][imageframe lightbox="no" lightbox_image="" style_type="none" hover_type="none" bordercolor="" bordersize="0px" borderradius="0" stylecolor="" align="none" link="" linktarget="_self" animation_type="0" animation_direction="down" animation_speed="0.1" animation_offset="" hide_on_mobile="no" class="" id=""]
  [/imageframe][separator style_type="none" top_margin="10px" bottom_margin="10px" sep_color="" border_size="" icon="" icon_circle="" icon_circle_color="" width="" alignment="center" class="" id=""][fusion_text]Here’s how ridiculously easy it is!
How it’s done: Just fill the little compartments with Mum’s favourite chocolates or sweets. Download, print and trim the tag. Punch a hole in the corner and tie it on with some ribbon. Find the full instructions here.[/fusion_text][title size="2" content_align="left" style_type="double solid" sep_color="" margin_top="" margin_bottom="" class="" id=""]DIY Hug Pillow[/title][fusion_text]Bring a relaxing end to Mother's Day with a DIY hug pillow – an intriguing, handmade and comfortably smooth pillow which features your arms wrapped around in a generously-sized hug.
What could be better?
What you’ll need: A pillow, scrap paper, two pieces of felt, a pen for felt, scissors, hot glue gun[/fusion_text][imageframe lightbox="no" lightbox_image="" style_type="none" hover_type="none" bordercolor="" bordersize="0px" borderradius="0" stylecolor="" align="none" link="" linktarget="_self" animation_type="0" animation_direction="down" animation_speed="0.1" animation_offset="" hide_on_mobile="no" class="" id=""]
[/imageframe][separator style_type="none" top_margin="10px" bottom_margin="10px" sep_color="" border_size="" icon="" icon_circle="" icon_circle_color="" width="" alignment="center" class="" id=""][fusion_text]Here’s how ridiculously easy it is!
How it’s done: Just fill the little compartments with Mum’s favourite chocolates or sweets. Download, print and trim the tag. Punch a hole in the corner and tie it on with some ribbon. Find the full instructions here.[/fusion_text][title size="2" content_align="left" style_type="double solid" sep_color="" margin_top="" margin_bottom="" class="" id=""]DIY Hug Pillow[/title][fusion_text]Bring a relaxing end to Mother's Day with a DIY hug pillow – an intriguing, handmade and comfortably smooth pillow which features your arms wrapped around in a generously-sized hug.
What could be better?
What you’ll need: A pillow, scrap paper, two pieces of felt, a pen for felt, scissors, hot glue gun[/fusion_text][imageframe lightbox="no" lightbox_image="" style_type="none" hover_type="none" bordercolor="" bordersize="0px" borderradius="0" stylecolor="" align="none" link="" linktarget="_self" animation_type="0" animation_direction="down" animation_speed="0.1" animation_offset="" hide_on_mobile="no" class="" id=""]  [/imageframe][separator style_type="none" top_margin="10px" bottom_margin="10px" sep_color="" border_size="" icon="" icon_circle="" icon_circle_color="" width="" alignment="center" class="" id=""][fusion_text]How it’s done:
Trace your hands on your scrap paper and cut out the outline with your scissors. Then place your paper hand template on your pieces of felt and trace around the hand. Then flip the hand over and trace once more hand (creating a left and a right hand).
After, cut out your felt hands and position your hands as desired and glue them into place (preferably replicating a hug). Cut out your mum’s initials with any leftover felt and glue them into the centre of the pillow.
Find the full instructions here.[/fusion_text][title size="2" content_align="left" style_type="double solid" sep_color="" margin_top="" margin_bottom="" class="" id=""]DIY Coconut Rose Body Scrub[/title][fusion_text]If Mum or Grandma needs a little pampering, this is an easy homemade Mother’s Day gift that only requires three basic ingredients and an airtight container that would look great in the bathroom.[/fusion_text][imageframe lightbox="no" lightbox_image="" style_type="none" hover_type="none" bordercolor="" bordersize="0px" borderradius="0" stylecolor="" align="none" link="" linktarget="_self" animation_type="0" animation_direction="down" animation_speed="0.1" animation_offset="" hide_on_mobile="no" class="" id=""]
[/imageframe][separator style_type="none" top_margin="10px" bottom_margin="10px" sep_color="" border_size="" icon="" icon_circle="" icon_circle_color="" width="" alignment="center" class="" id=""][fusion_text]How it’s done:
Trace your hands on your scrap paper and cut out the outline with your scissors. Then place your paper hand template on your pieces of felt and trace around the hand. Then flip the hand over and trace once more hand (creating a left and a right hand).
After, cut out your felt hands and position your hands as desired and glue them into place (preferably replicating a hug). Cut out your mum’s initials with any leftover felt and glue them into the centre of the pillow.
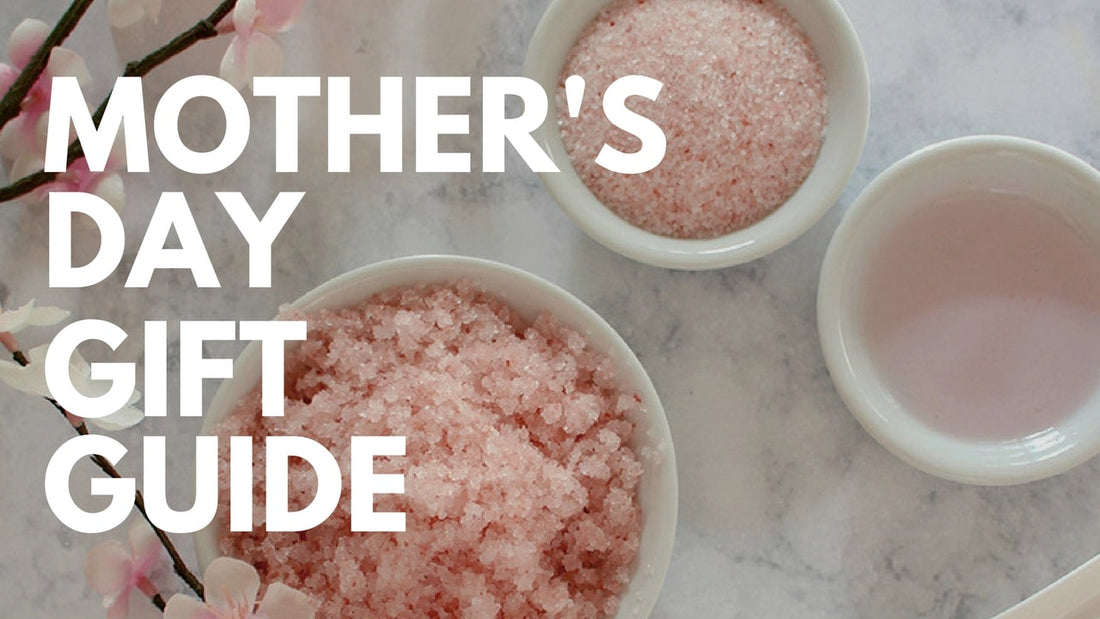
Find the full instructions here.[/fusion_text][title size="2" content_align="left" style_type="double solid" sep_color="" margin_top="" margin_bottom="" class="" id=""]DIY Coconut Rose Body Scrub[/title][fusion_text]If Mum or Grandma needs a little pampering, this is an easy homemade Mother’s Day gift that only requires three basic ingredients and an airtight container that would look great in the bathroom.[/fusion_text][imageframe lightbox="no" lightbox_image="" style_type="none" hover_type="none" bordercolor="" bordersize="0px" borderradius="0" stylecolor="" align="none" link="" linktarget="_self" animation_type="0" animation_direction="down" animation_speed="0.1" animation_offset="" hide_on_mobile="no" class="" id=""]  [/imageframe][separator style_type="none" top_margin="10px" bottom_margin="10px" sep_color="" border_size="" icon="" icon_circle="" icon_circle_color="" width="" alignment="center" class="" id=""][fusion_text]What you’ll need: Coconut oil, pink Himalayan salt or sea salt, rose organic essential oil[/fusion_text][imageframe lightbox="no" lightbox_image="" style_type="none" hover_type="none" bordercolor="" bordersize="0px" borderradius="0" stylecolor="" align="none" link="" linktarget="_self" animation_type="0" animation_direction="down" animation_speed="0.1" animation_offset="" hide_on_mobile="no" class="" id=""]
  [/imageframe][separator style_type="none" top_margin="10px" bottom_margin="10px" sep_color="" border_size="" icon="" icon_circle="" icon_circle_color="" width="" alignment="center" class="" id=""][fusion_text]How it’s done: Simply whisk one tablespoon of coconut oil, 3-4 drops of rose organic essential oil and 2 tablespoons of finely ground pink Himalayan salt together with a fork for a ready-to-use scrub!
Use on hands, feet, arms, and legs.
Store leftovers in an airtight container.[/fusion_text][imageframe lightbox="no" lightbox_image="" style_type="none" hover_type="none" bordercolor="" bordersize="0px" borderradius="0" stylecolor="" align="none" link="" linktarget="_self" animation_type="0" animation_direction="down" animation_speed="0.1" animation_offset="" hide_on_mobile="no" class="" id=""]
[/imageframe][separator style_type="none" top_margin="10px" bottom_margin="10px" sep_color="" border_size="" icon="" icon_circle="" icon_circle_color="" width="" alignment="center" class="" id=""][fusion_text]How it’s done: Simply whisk one tablespoon of coconut oil, 3-4 drops of rose organic essential oil and 2 tablespoons of finely ground pink Himalayan salt together with a fork for a ready-to-use scrub!
Use on hands, feet, arms, and legs.
Store leftovers in an airtight container.[/fusion_text][imageframe lightbox="no" lightbox_image="" style_type="none" hover_type="none" bordercolor="" bordersize="0px" borderradius="0" stylecolor="" align="none" link="" linktarget="_self" animation_type="0" animation_direction="down" animation_speed="0.1" animation_offset="" hide_on_mobile="no" class="" id=""]  [/imageframe][separator style_type="none" top_margin="10px" bottom_margin="10px" sep_color="" border_size="" icon="" icon_circle="" icon_circle_color="" width="" alignment="center" class="" id=""][fusion_text]Find the full instructions here.[/fusion_text][title size="2" content_align="left" style_type="double solid" sep_color="" margin_top="" margin_bottom="" class="" id=""]Thoughts?[/title][fusion_text]Even after surprising your mother with your homemade crafts and presents, make sure that you shower your Mum with cards, kisses, hugs and love all day long because the only thing she wants is to spend some time with you!
How will you show your mum you care this Mother's Day? Share it in the comments below![/fusion_text]
[/imageframe][separator style_type="none" top_margin="10px" bottom_margin="10px" sep_color="" border_size="" icon="" icon_circle="" icon_circle_color="" width="" alignment="center" class="" id=""][fusion_text]Find the full instructions here.[/fusion_text][title size="2" content_align="left" style_type="double solid" sep_color="" margin_top="" margin_bottom="" class="" id=""]Thoughts?[/title][fusion_text]Even after surprising your mother with your homemade crafts and presents, make sure that you shower your Mum with cards, kisses, hugs and love all day long because the only thing she wants is to spend some time with you!
How will you show your mum you care this Mother's Day? Share it in the comments below![/fusion_text]
[/imageframe][separator style_type="none" top_margin="10px" bottom_margin="10px" sep_color="" border_size="" icon="" icon_circle="" icon_circle_color="" width="" alignment="center" class="" id=""][fusion_text]With Mother's Day approaching, it's time to start searching for the perfect gift. Mums deserve the best every day of the year, but on Sunday 26th March, treat her to something extra special with one of these gifts, carefully selected to make the day as perfect as possible.
Whether you're shopping for mum, grandma, your mother-in-law, or even a friend, we have 9 unique handmade ideas that are perfect for the special women in your life.[/fusion_text][title size="2" content_align="left" style_type="double solid" sep_color="" margin_top="" margin_bottom="" class="" id=""]Mason Jar Frame Vase[/title][fusion_text]Start the day with a gorgeous bouquet of fresh flowers, before giving your mum something to smile about by turning a mason jar into a frame vase.
What you’ll need: Mason jar, paint brush, tape, spray paint, vinyl sticker and picture, coloured acrylic paint[/fusion_text][imageframe lightbox="no" lightbox_image="" style_type="none" hover_type="none" bordercolor="" bordersize="0px" borderradius="0" stylecolor="" align="none" link="" linktarget="_self" animation_type="0" animation_direction="down" animation_speed="0.1" animation_offset="" hide_on_mobile="no" class="" id=""] [/imageframe][separator style_type="none" top_margin="10px" bottom_margin="10px" sep_color="" border_size="" icon="" icon_circle="" icon_circle_color="" width="" alignment="center" class="" id=""][fusion_text]How it’s done:
To create the picture frame window on your mason jar, place a shaped sticker of your choice onto the jar using painter’s tape around the area that you don’t want painted.
You'd do it like this:[/fusion_text][imageframe lightbox="no" lightbox_image="" style_type="none" hover_type="none" bordercolor="" bordersize="0px" borderradius="0" stylecolor="" align="none" link="" linktarget="_self" animation_type="0" animation_direction="down" animation_speed="0.1" animation_offset="" hide_on_mobile="no" class="" id=""] [/imageframe][separator style_type="none" top_margin="10px" bottom_margin="10px" sep_color="" border_size="" icon="" icon_circle="" icon_circle_color="" width="" alignment="center" class="" id=""][fusion_text]After that, using acrylic paint, paint the outside of the jar and once done remove your sticker before the paint can dry.
You do not want to wait until the paint is dry or else it will be difficult to remove your sticker.
Then cut a picture of your choice to size and attach to the inside of your jar with painter’s tape.[/fusion_text][one_half last="no" spacing="yes" center_content="no" hide_on_mobile="no" background_color="" background_image="" background_repeat="no-repeat" background_position="left top" hover_type="none" link="" border_position="all" border_size="0px" border_color="" border_style="" padding="" margin_top="" margin_bottom="" animation_type="" animation_direction="" animation_speed="0.1" animation_offset="" class="" id=""][imageframe lightbox="no" lightbox_image="" style_type="none" hover_type="none" bordercolor="" bordersize="0px" borderradius="0" stylecolor="" align="none" link="" linktarget="_self" animation_type="0" animation_direction="down" animation_speed="0.1" animation_offset="" hide_on_mobile="no" class="" id=""] [/imageframe][/one_half][one_half last="yes" spacing="yes" center_content="no" hide_on_mobile="no" background_color="" background_image="" background_repeat="no-repeat" background_position="left top" hover_type="none" link="" border_position="all" border_size="0px" border_color="" border_style="" padding="" margin_top="" margin_bottom="" animation_type="" animation_direction="" animation_speed="0.1" animation_offset="" class="" id=""][imageframe lightbox="no" lightbox_image="" style_type="none" hover_type="none" bordercolor="" bordersize="0px" borderradius="0" stylecolor="" align="none" link="" linktarget="_self" animation_type="0" animation_direction="down" animation_speed="0.1" animation_offset="" hide_on_mobile="no" class="" id=""] [/imageframe][/one_half][separator style_type="none" top_margin="10px" bottom_margin="10px" sep_color="" border_size="" icon="" icon_circle="" icon_circle_color="" width="" alignment="center" class="" id=""][fusion_text]Here's the secret: Make sure to seal the outside of the painted jar with clear spray paint as the paint will easily scrape off the jar if it is not sealed.
Now you're ready to place a paper cup inside your jar to help maintain the picture from any water substances and to hold your selection of flowers in place.
Done!
Find the full instructions here.[/fusion_text][title size="2" content_align="left" style_type="double solid" sep_color="" margin_top="" margin_bottom="" class="" id=""]DIY Marbled Mugs With Nail Polish[/title][fusion_text]Treat mum & explore your creative side this Mother's Day. These marble designed colourful mugs will make mum instantly feel like she's ready to sip on her favourite hot drink.[/fusion_text][imageframe lightbox="no" lightbox_image="" style_type="none" hover_type="none" bordercolor="" bordersize="0px" borderradius="0" stylecolor="" align="none" link="" linktarget="_self" animation_type="0" animation_direction="down" animation_speed="0.1" animation_offset="" hide_on_mobile="no" class="" id=""] [/imageframe][separator style_type="none" top_margin="10px" bottom_margin="10px" sep_color="" border_size="" icon="" icon_circle="" icon_circle_color="" width="" alignment="center" class="" id=""][fusion_text]What you’ll need: Plain mugs, toothpicks, nail polish (preferably not quick dry), old plastic container[/fusion_text][imageframe lightbox="no" lightbox_image="" style_type="none" hover_type="none" bordercolor="" bordersize="0px" borderradius="0" stylecolor="" align="none" link="" linktarget="_self" animation_type="0" animation_direction="down" animation_speed="0.1" animation_offset="" hide_on_mobile="no" class="" id=""] [/imageframe][separator style_type="none" top_margin="10px" bottom_margin="10px" sep_color="" border_size="" icon="" icon_circle="" icon_circle_color="" width="" alignment="center" class="" id=""][fusion_text]How it’s done:
Place your plastic container on a flat surface and boil your kettle. Once boiled, fill your container halfway with boiling hot water.[/fusion_text][imageframe lightbox="no" lightbox_image="" style_type="none" hover_type="none" bordercolor="" bordersize="0px" borderradius="0" stylecolor="" align="none" link="" linktarget="_self" animation_type="0" animation_direction="down" animation_speed="0.1" animation_offset="" hide_on_mobile="no" class="" id=""] [/imageframe][separator style_type="none" top_margin="10px" bottom_margin="10px" sep_color="" border_size="" icon="" icon_circle="" icon_circle_color="" width="" alignment="center" class="" id=""][fusion_text]With the nail polish bottle, very close to the surface of the water, pour a drop or two of polish into the water. Then swiftly use your toothpick to swirl the polish around in the water.
Next quickly dip your mug in the water! After that, place the mug on a paper towel to dry and you’re done!
Now make it happen!
Find the full instructions here.[/fusion_text][title size="2" content_align="left" style_type="double solid" sep_color="" margin_top="" margin_bottom="" class="" id=""]DIY Heartstring Wall Art[/title][fusion_text]Here’s a gift that will really tug on your mum’s heartstrings. This DIY string art piece may look complicated, but you’ll be surprised at how easy it is to do.[/fusion_text][imageframe lightbox="no" lightbox_image="" style_type="none" hover_type="none" bordercolor="" bordersize="0px" borderradius="0" stylecolor="" align="none" link="" linktarget="_self" animation_type="0" animation_direction="down" animation_speed="0.1" animation_offset="" hide_on_mobile="no" class="" id=""] [/imageframe][separator style_type="none" top_margin="10px" bottom_margin="10px" sep_color="" border_size="" icon="" icon_circle="" icon_circle_color="" width="" alignment="center" class="" id=""][fusion_text]What you’ll need: Embroidery thread, 1” nails, scissors, hammer, piece of pine, heart template[/fusion_text][imageframe lightbox="no" lightbox_image="" style_type="none" hover_type="none" bordercolor="" bordersize="0px" borderradius="0" stylecolor="" align="none" link="" linktarget="_self" animation_type="0" animation_direction="down" animation_speed="0.1" animation_offset="" hide_on_mobile="no" class="" id=""] [/imageframe][separator style_type="none" top_margin="10px" bottom_margin="10px" sep_color="" border_size="" icon="" icon_circle="" icon_circle_color="" width="" alignment="center" class="" id=""][fusion_text]How it’s done:
First place and tape your heart template to the centre of your wood plank. Now start hammering either the top or bottom of your heart and you’re your way around.
Try and keep the spacing as even as possible, once done remove your paper template and unwind some embroidery thread.[/fusion_text][imageframe lightbox="no" lightbox_image="" style_type="none" hover_type="none" bordercolor="" bordersize="0px" borderradius="0" stylecolor="" align="none" link="" linktarget="_self" animation_type="0" animation_direction="down" animation_speed="0.1" animation_offset="" hide_on_mobile="no" class="" id=""] [/imageframe][separator style_type="none" top_margin="10px" bottom_margin="10px" sep_color="" border_size="" icon="" icon_circle="" icon_circle_color="" width="" alignment="center" class="" id=""][fusion_text]Tie a double knot around your first nail and cut off any excess thread. Now, start connecting the nails with thread and keep going until you have connected all the nails.
When you finish, tie another double knot around a nail and cut off the excess thread again.
Remember to cut as close to the knot a possible so that you don’t see any bits of thread sticking out.
It's pretty straightforward once you think about it...
Find the full instructions here.[/fusion_text][title size="2" content_align="left" style_type="double solid" sep_color="" margin_top="" margin_bottom="" class="" id=""]DIY Cupcake Bouquet[/title][fusion_text]Sometimes the best gift you can give mum is your time. Give the gift of sugar-coated, sweet and fluffy cupcakes this Mother’s Day when you gift a bouquet of these rose moulded cupcakes decorated with creamy frosting.[/fusion_text][imageframe lightbox="no" lightbox_image="" style_type="none" hover_type="none" bordercolor="" bordersize="0px" borderradius="0" stylecolor="" align="none" link="" linktarget="_self" animation_type="0" animation_direction="down" animation_speed="0.1" animation_offset="" hide_on_mobile="no" class="" id=""] [/imageframe][separator style_type="none" top_margin="10px" bottom_margin="10px" sep_color="" border_size="" icon="" icon_circle="" icon_circle_color="" width="" alignment="center" class="" id=""][fusion_text]What you’ll need: Cupcakes, frosting, flower pot and styrofoam ball, green tissue paper, tape, piping bag and toothpicks[/fusion_text][imageframe lightbox="no" lightbox_image="" style_type="none" hover_type="none" bordercolor="" bordersize="0px" borderradius="0" stylecolor="" align="none" link="" linktarget="_self" animation_type="0" animation_direction="down" animation_speed="0.1" animation_offset="" hide_on_mobile="no" class="" id=""] [/imageframe][separator style_type="none" top_margin="10px" bottom_margin="10px" sep_color="" border_size="" icon="" icon_circle="" icon_circle_color="" width="" alignment="center" class="" id=""][fusion_text]How it’s done:
Bake or buy cupcakes of your choice e.g. vanilla, chocolate etc. Make buttercream frosting using a suitable recipe and fill a piping bag with the frosting.
Carefully pipe a cupcake rose on each cupcake. Once done, place the cupcakes in the fridge to keep the frosting firm.
Place the styrofoam ball into your flower pot. Place two toothpicks in each area where you want a cupcake. Then remove the cupcakes from the fridge and slide a cupcake onto each pair of toothpicks.
Let's look at it in detail:[/fusion_text][imageframe lightbox="no" lightbox_image="" style_type="none" hover_type="none" bordercolor="" bordersize="0px" borderradius="0" stylecolor="" align="none" link="" linktarget="_self" animation_type="0" animation_direction="down" animation_speed="0.1" animation_offset="" hide_on_mobile="no" class="" id=""] [/imageframe][separator style_type="none" top_margin="10px" bottom_margin="10px" sep_color="" border_size="" icon="" icon_circle="" icon_circle_color="" width="" alignment="center" class="" id=""][fusion_text]After that, cut and shape the green tissue paper into a small accordion and place a piece of clear tape at the pinched part of the tissue paper and stick it to the exposed styrofoam in between the cupcakes.
And you’re done!
Find the full instructions here.[/fusion_text][title size="2" content_align="left" style_type="double solid" sep_color="" margin_top="" margin_bottom="" class="" id=""]Marbled Clay Jewellery Dish[/title][fusion_text]With Mother’s Day, weeks away, this little marbled clay ring dish is the perfect gift to make for your mum.
What you’ll need: Coloured oven bake clay, plastic clay knife, small bowl, gold liquid gilding, small paintbrush, rolling pin, large jar[/fusion_text][imageframe lightbox="no" lightbox_image="" style_type="none" hover_type="none" bordercolor="" bordersize="0px" borderradius="0" stylecolor="" align="none" link="" linktarget="_self" animation_type="0" animation_direction="down" animation_speed="0.1" animation_offset="" hide_on_mobile="no" class="" id=""] [/imageframe][separator style_type="none" top_margin="10px" bottom_margin="10px" sep_color="" border_size="" icon="" icon_circle="" icon_circle_color="" width="" alignment="center" class="" id=""][fusion_text]How it’s done:
Roll each colour of clay that you want to use into a snake about 5" long then combine them into one big roll and twist together.
Roll the large twist into a snake about twice the original length then smoosh all the clay into a ball.[/fusion_text][imageframe lightbox="no" lightbox_image="" style_type="none" hover_type="none" bordercolor="" bordersize="0px" borderradius="0" stylecolor="" align="none" link="" linktarget="_self" animation_type="0" animation_direction="down" animation_speed="0.1" animation_offset="" hide_on_mobile="no" class="" id=""] [/imageframe][separator style_type="none" top_margin="10px" bottom_margin="10px" sep_color="" border_size="" icon="" icon_circle="" icon_circle_color="" width="" alignment="center" class="" id=""][fusion_text]Use a rolling pin or glass jar to roll out your marbled ball to 1/4" thick and use a round item about 6" wide as a template and cut out your dish circle with a clay knife.
Place your circle gently into an oven-safe bowl that is a little smaller than your circle and bake the bowl per the temperature on the clay package.
Remove the bowl from the oven and allow the clay to cool before turning the larger bowl upside down and tapping lightly until the clay dish falls out.[/fusion_text][imageframe lightbox="no" lightbox_image="" style_type="none" hover_type="none" bordercolor="" bordersize="0px" borderradius="0" stylecolor="" align="none" link="" linktarget="_self" animation_type="0" animation_direction="down" animation_speed="0.1" animation_offset="" hide_on_mobile="no" class="" id=""] [/imageframe][separator style_type="none" top_margin="10px" bottom_margin="10px" sep_color="" border_size="" icon="" icon_circle="" icon_circle_color="" width="" alignment="center" class="" id=""][fusion_text]Once the clay is completely cool, use a small brush to paint the rim of the dish and allow the paint to dry. Seal the dish with a glaze if you desire.[/fusion_text][imageframe lightbox="no" lightbox_image="" style_type="none" hover_type="none" bordercolor="" bordersize="0px" borderradius="0" stylecolor="" align="none" link="" linktarget="_self" animation_type="0" animation_direction="down" animation_speed="0.1" animation_offset="" hide_on_mobile="no" class="" id=""] [/imageframe][separator style_type="none" top_margin="10px" bottom_margin="10px" sep_color="" border_size="" icon="" icon_circle="" icon_circle_color="" width="" alignment="center" class="" id=""][fusion_text]So what are you waiting for?
Find the full instructions here.[/fusion_text][title size="2" content_align="left" style_type="double solid" sep_color="" margin_top="" margin_bottom="" class="" id=""]DIY Bath Bombs[/title][fusion_text]Who doesn’t love an opportunity to relax, unwind and indulge? Give mum the gift of an at-home spa, so that she can take some time for herself, even if she only has an hour to spare.
The gift of luxury is always a winner! Pick a gorgeous new scent or a classic you just know she will adore, and make a jar of luxe bath bombs to encourage her to take a dang break for once.[/fusion_text][imageframe lightbox="no" lightbox_image="" style_type="none" hover_type="none" bordercolor="" bordersize="0px" borderradius="0" stylecolor="" align="none" link="" linktarget="_self" animation_type="0" animation_direction="down" animation_speed="0.1" animation_offset="" hide_on_mobile="no" class="" id=""] [/imageframe][separator style_type="none" top_margin="10px" bottom_margin="10px" sep_color="" border_size="" icon="" icon_circle="" icon_circle_color="" width="" alignment="center" class="" id=""][fusion_text]What you’ll need: Baking soda, citric acid, fragrance oil, pipettes, mini-muffin pan, wax paper, water-free colourant, measuring cup, bowl and whisk.
Trust me. It’ll all be worth it.[/fusion_text][imageframe lightbox="no" lightbox_image="" style_type="none" hover_type="none" bordercolor="" bordersize="0px" borderradius="0" stylecolor="" align="none" link="" linktarget="_self" animation_type="0" animation_direction="down" animation_speed="0.1" animation_offset="" hide_on_mobile="no" class="" id=""] [/imageframe][separator style_type="none" top_margin="10px" bottom_margin="10px" sep_color="" border_size="" icon="" icon_circle="" icon_circle_color="" width="" alignment="center" class="" id=""][fusion_text]How it’s done: Start by adding one cup of baking soda to your mixing bowl and work out all the clumps. Next, add one half cup of citric acid to the baking soda – thoroughly mix and break up any clumps. Now add a few ounces of fragrance oil and thoroughly mix into the powders. Then add your colourant, using only non-water based liquid colour.
After that use a spray bottle to add some witch hazel. If your mixture makes a nice clump – it’s ready! Add the mixture a mini-muffin pan, set a timer for 10 minutes and let them sit. After the time is up, carefully turn them onto a sheet of wax paper to let them fully dry. Find the full instructions here.[/fusion_text][title size="2" content_align="left" style_type="double solid" sep_color="" margin_top="" margin_bottom="" class="" id=""]Mum's Emergency Stash[/title][fusion_text]It’s time to start munching on little treats! This is so easy to make - you can easily pick up a clear organiser box from a pound shop or supermarket and add a little handcrafted gift tag.
How can you resist?[/fusion_text][imageframe lightbox="no" lightbox_image="" style_type="none" hover_type="none" bordercolor="" bordersize="0px" borderradius="0" stylecolor="" align="none" link="" linktarget="_self" animation_type="0" animation_direction="down" animation_speed="0.1" animation_offset="" hide_on_mobile="no" class="" id=""] [/imageframe][separator style_type="none" top_margin="10px" bottom_margin="10px" sep_color="" border_size="" icon="" icon_circle="" icon_circle_color="" width="" alignment="center" class="" id=""][fusion_text]What you’ll need: Plastic organiser box, ribbon, chocolate, card stock, printable ‘mum’s emergency stash’ tag[/fusion_text][imageframe lightbox="no" lightbox_image="" style_type="none" hover_type="none" bordercolor="" bordersize="0px" borderradius="0" stylecolor="" align="none" link="" linktarget="_self" animation_type="0" animation_direction="down" animation_speed="0.1" animation_offset="" hide_on_mobile="no" class="" id=""] [/imageframe][separator style_type="none" top_margin="10px" bottom_margin="10px" sep_color="" border_size="" icon="" icon_circle="" icon_circle_color="" width="" alignment="center" class="" id=""][fusion_text]Here’s how ridiculously easy it is!
How it’s done: Just fill the little compartments with Mum’s favourite chocolates or sweets. Download, print and trim the tag. Punch a hole in the corner and tie it on with some ribbon. Find the full instructions here.[/fusion_text][title size="2" content_align="left" style_type="double solid" sep_color="" margin_top="" margin_bottom="" class="" id=""]DIY Hug Pillow[/title][fusion_text]Bring a relaxing end to Mother's Day with a DIY hug pillow – an intriguing, handmade and comfortably smooth pillow which features your arms wrapped around in a generously-sized hug.
What could be better?
What you’ll need: A pillow, scrap paper, two pieces of felt, a pen for felt, scissors, hot glue gun[/fusion_text][imageframe lightbox="no" lightbox_image="" style_type="none" hover_type="none" bordercolor="" bordersize="0px" borderradius="0" stylecolor="" align="none" link="" linktarget="_self" animation_type="0" animation_direction="down" animation_speed="0.1" animation_offset="" hide_on_mobile="no" class="" id=""] [/imageframe][separator style_type="none" top_margin="10px" bottom_margin="10px" sep_color="" border_size="" icon="" icon_circle="" icon_circle_color="" width="" alignment="center" class="" id=""][fusion_text]How it’s done:
Trace your hands on your scrap paper and cut out the outline with your scissors. Then place your paper hand template on your pieces of felt and trace around the hand. Then flip the hand over and trace once more hand (creating a left and a right hand).
After, cut out your felt hands and position your hands as desired and glue them into place (preferably replicating a hug). Cut out your mum’s initials with any leftover felt and glue them into the centre of the pillow.
Find the full instructions here.[/fusion_text][title size="2" content_align="left" style_type="double solid" sep_color="" margin_top="" margin_bottom="" class="" id=""]DIY Coconut Rose Body Scrub[/title][fusion_text]If Mum or Grandma needs a little pampering, this is an easy homemade Mother’s Day gift that only requires three basic ingredients and an airtight container that would look great in the bathroom.[/fusion_text][imageframe lightbox="no" lightbox_image="" style_type="none" hover_type="none" bordercolor="" bordersize="0px" borderradius="0" stylecolor="" align="none" link="" linktarget="_self" animation_type="0" animation_direction="down" animation_speed="0.1" animation_offset="" hide_on_mobile="no" class="" id=""] [/imageframe][separator style_type="none" top_margin="10px" bottom_margin="10px" sep_color="" border_size="" icon="" icon_circle="" icon_circle_color="" width="" alignment="center" class="" id=""][fusion_text]What you’ll need: Coconut oil, pink Himalayan salt or sea salt, rose organic essential oil[/fusion_text][imageframe lightbox="no" lightbox_image="" style_type="none" hover_type="none" bordercolor="" bordersize="0px" borderradius="0" stylecolor="" align="none" link="" linktarget="_self" animation_type="0" animation_direction="down" animation_speed="0.1" animation_offset="" hide_on_mobile="no" class="" id=""] [/imageframe][separator style_type="none" top_margin="10px" bottom_margin="10px" sep_color="" border_size="" icon="" icon_circle="" icon_circle_color="" width="" alignment="center" class="" id=""][fusion_text]How it’s done: Simply whisk one tablespoon of coconut oil, 3-4 drops of rose organic essential oil and 2 tablespoons of finely ground pink Himalayan salt together with a fork for a ready-to-use scrub!
Use on hands, feet, arms, and legs.
Store leftovers in an airtight container.[/fusion_text][imageframe lightbox="no" lightbox_image="" style_type="none" hover_type="none" bordercolor="" bordersize="0px" borderradius="0" stylecolor="" align="none" link="" linktarget="_self" animation_type="0" animation_direction="down" animation_speed="0.1" animation_offset="" hide_on_mobile="no" class="" id=""] [/imageframe][separator style_type="none" top_margin="10px" bottom_margin="10px" sep_color="" border_size="" icon="" icon_circle="" icon_circle_color="" width="" alignment="center" class="" id=""][fusion_text]Find the full instructions here.[/fusion_text][title size="2" content_align="left" style_type="double solid" sep_color="" margin_top="" margin_bottom="" class="" id=""]Thoughts?[/title][fusion_text]Even after surprising your mother with your homemade crafts and presents, make sure that you shower your Mum with cards, kisses, hugs and love all day long because the only thing she wants is to spend some time with you!
How will you show your mum you care this Mother's Day? Share it in the comments below![/fusion_text]